Building Your WordPress Blog From Scratch
Building a blog can be really difficult, but thankfully, there are many CMS (content management systems) out there that you can use to easily build your blog in a few minutes. One of them is WordPress. With WordPress, you can build an entire blog in less than 10 minutes. It’s that easy. WordPress offers a drag and drop framework to create a WordPress blog.
As I mentioned in a previous publication, I love WordPress. WordPress powers about 40% of all websites on the internet. That is huge. It controls a large percentage of the blog market cap.
This implies that out of 100 websites on the internet, WordPress is responsible for 40 of them. Personally, I love WordPress, and I build all of my blogs using it. For instance, I built this specific website, princewilluchibu.com, using WordPress.
I’m going to show you all the steps you need to take to ensure you build a successful WordPress blog—one that will rank on Google and that your users will love in a few minutes or hours.
Registering a Domain Name
The first thing you need to do is get your domain registered. In my previous publication, I discussed choosing your domain and the things you should consider before doing so.
Once you get your domain registered, the next thing is to buy your hosting account.
It’s best to buy your domain and hosting from the same company to avoid the hassle of changing name servers and configuring things.
Furthermore, if there is an issue, the company can easily assist you without having to contact multiple companies.
Let’s talk about registering your domain. I’ve earlier talked about the best practices to choose a domain name. Consider going through first.
Steps to Register a Domain Name
The first thing you need to do is go to your hosting company. I’ve talked about the various hosting companies that are best for bloggers. You can check that publication out.
Here, I’ll walk you through the process using HarmonWeb.com.
Visit HarmonWeb.com. Enter the domain name in the search box ; including the domain extension (.com, .edu) click search to check if it’s available.
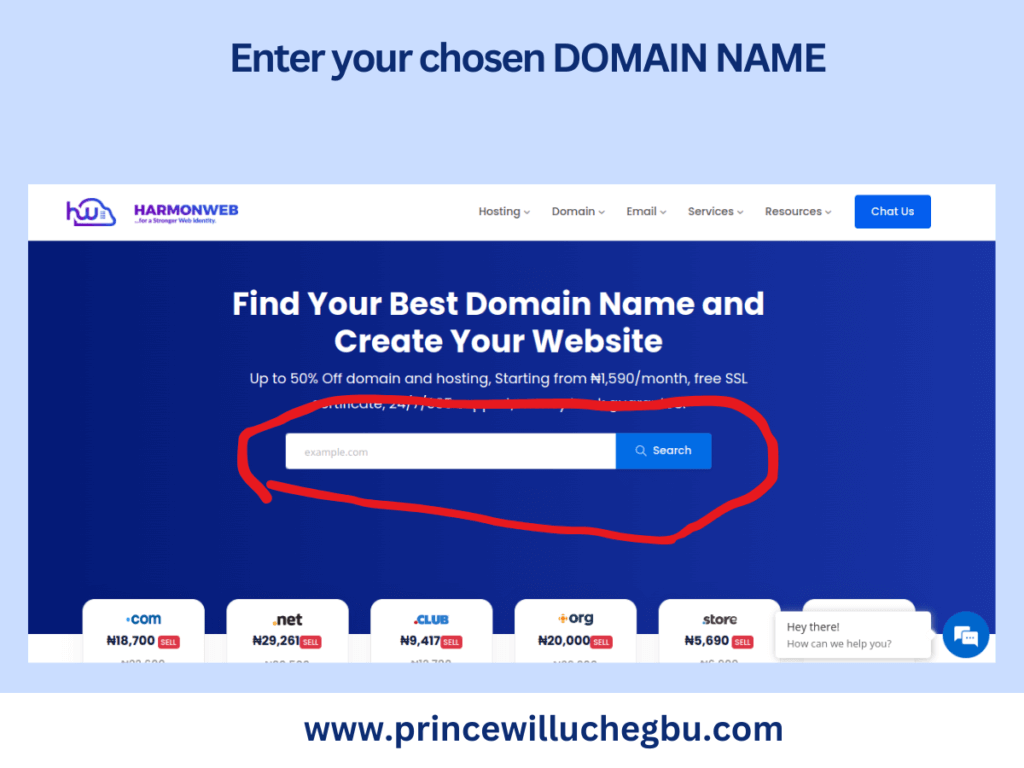
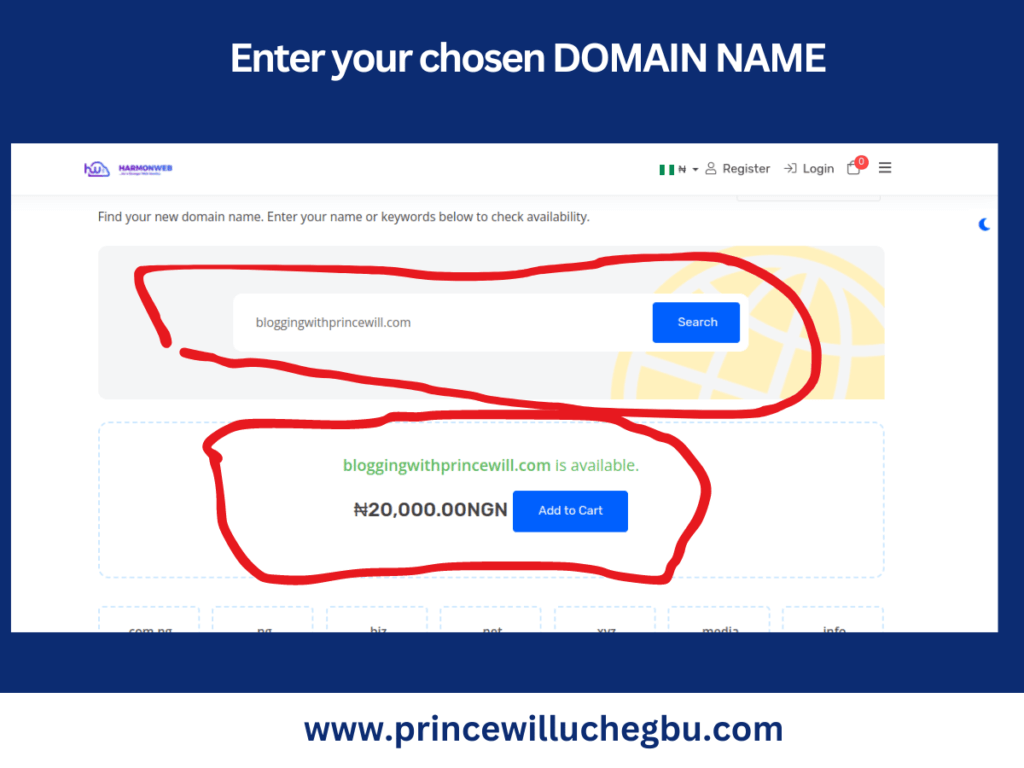
After checking availability, add the domain to your cart. Then, check out to complete the registration.
Once you proceed, you’ll be required to fill in your contact details, including your name, phone number, address, and a few other things. Also, you’ll have the option to choose a hosting account since you don’t have one. Then “Pay.”
To avoid confusion, once you confirm that your domain name is available, stop there and take the next step.
Choose a Hosting Plan
There are different types of hosting accounts: shared hosting, VPS, and dedicated hosting. As a beginner who does not have much money to spend, I would advise you to go with the shared hosting option. While each hosting option offers unique benefits, starting with shared hosting will suffice for you.
To get started, go to HarmonWeb hosting page.
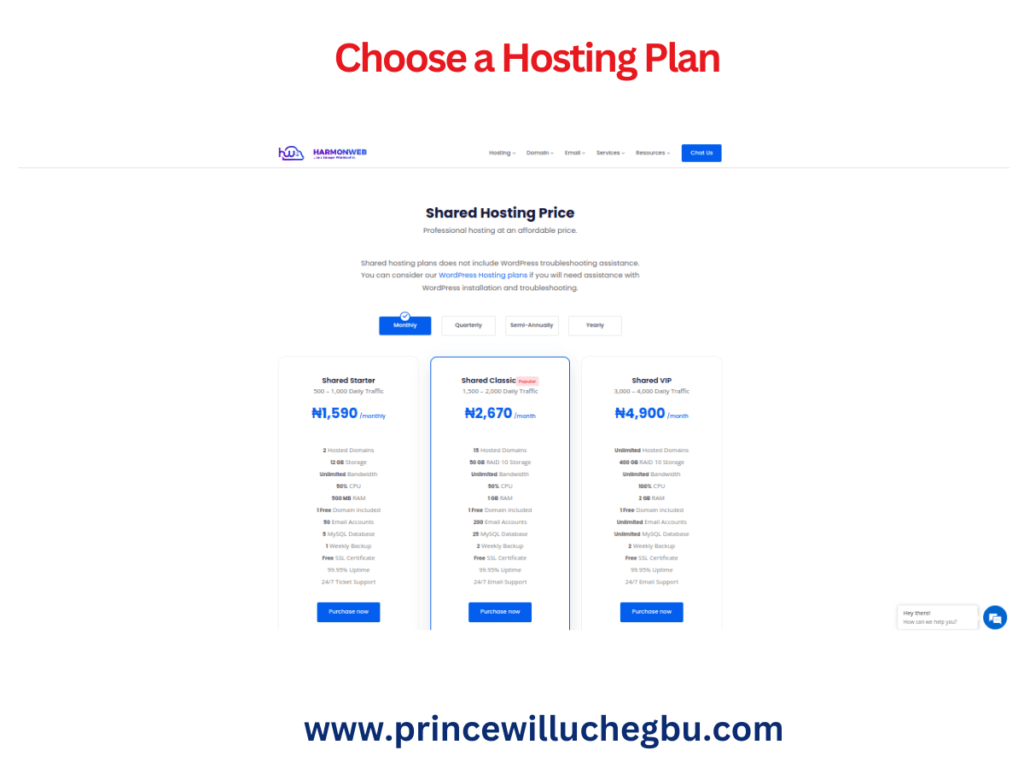
Choose the option you want. Click purchase now.
Scroll down, select Register a New Domain, and enter the domain name you’ve confirmed is available. To confirm once more, click search.
Now, click Continue to proceed with the registration.
On the next page, confirm that all the information is correct. If so, click continue, checkout, or proceed, depending on which one you see on the page.
The system will prompt you to enter your contact information. Fill out the form and continue to make payments.
If everything is successful, you’ll receive an email confirmation along with the domain and hosting account you’ve paid for. You can find it directly in your email or on the page where you made the payment. You’ll see an option to access your dashboard, from which you’ll proceed with the next step.
PS: You can register your domain name and buy a hosting account with any reliable hosting company. The process might change slightly.
Installing WordPress
Log into your hosting account and go to the cPanel section. Normally, WordPress should be under the script section in the cPanel. Scroll down to the script or installation section, click on the WordPress script, or just “WordPress.”
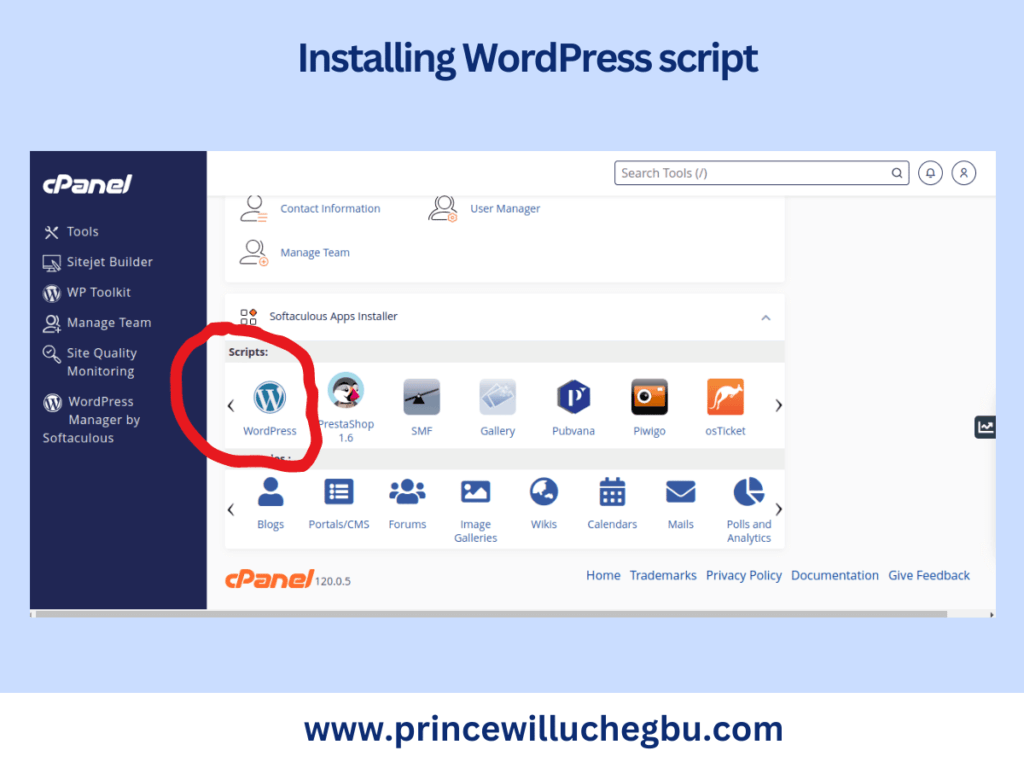
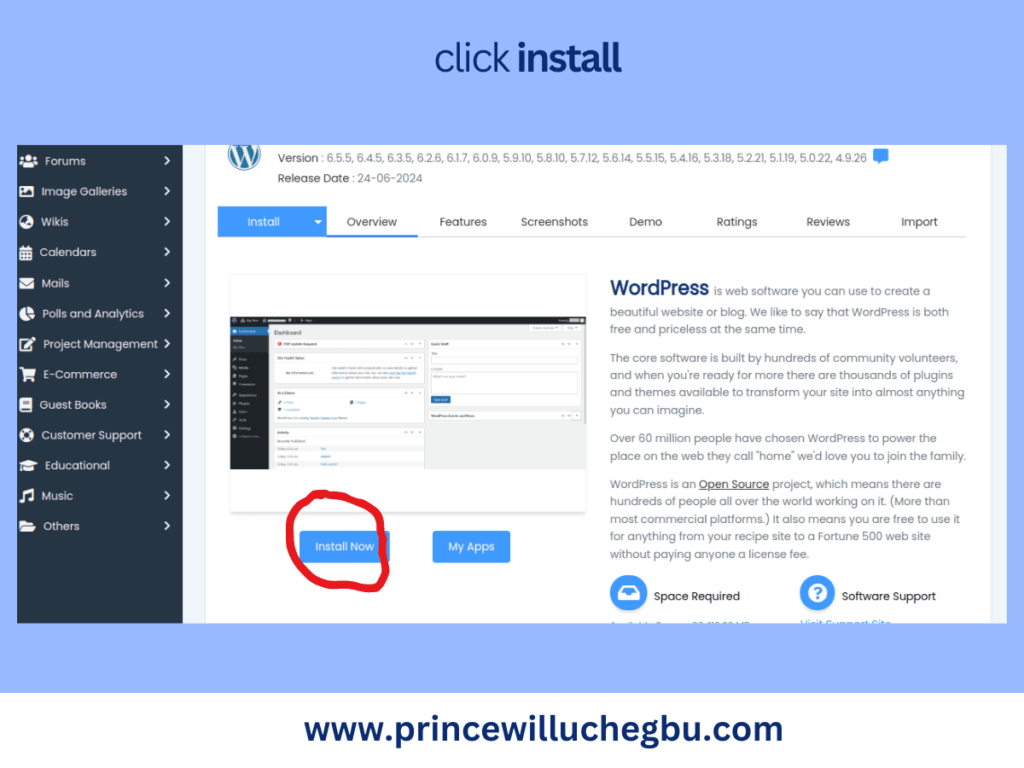
Once you’ve clicked on it, select “Install” or “Install now.”
Now select the domain name on which you want to install it. Ensure you change the directory; delete “WP” and keep it empty. Make sure to include “HTTPS” and “WWW” before your blog name so that an SSL certificate can work properly on your domain.
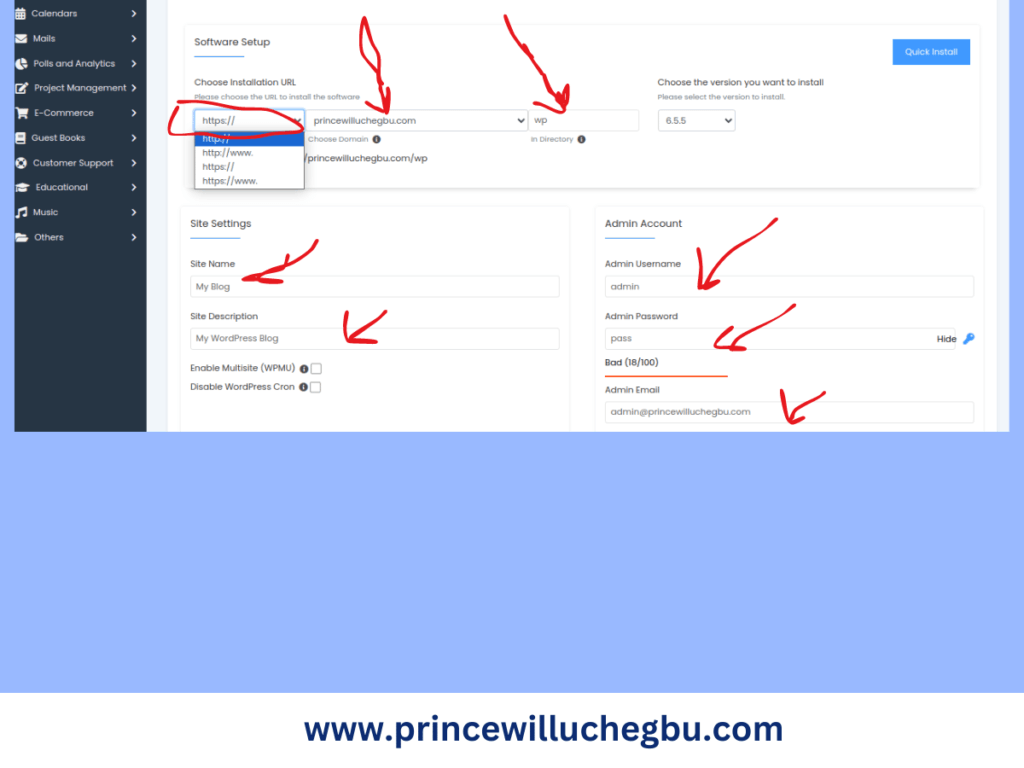
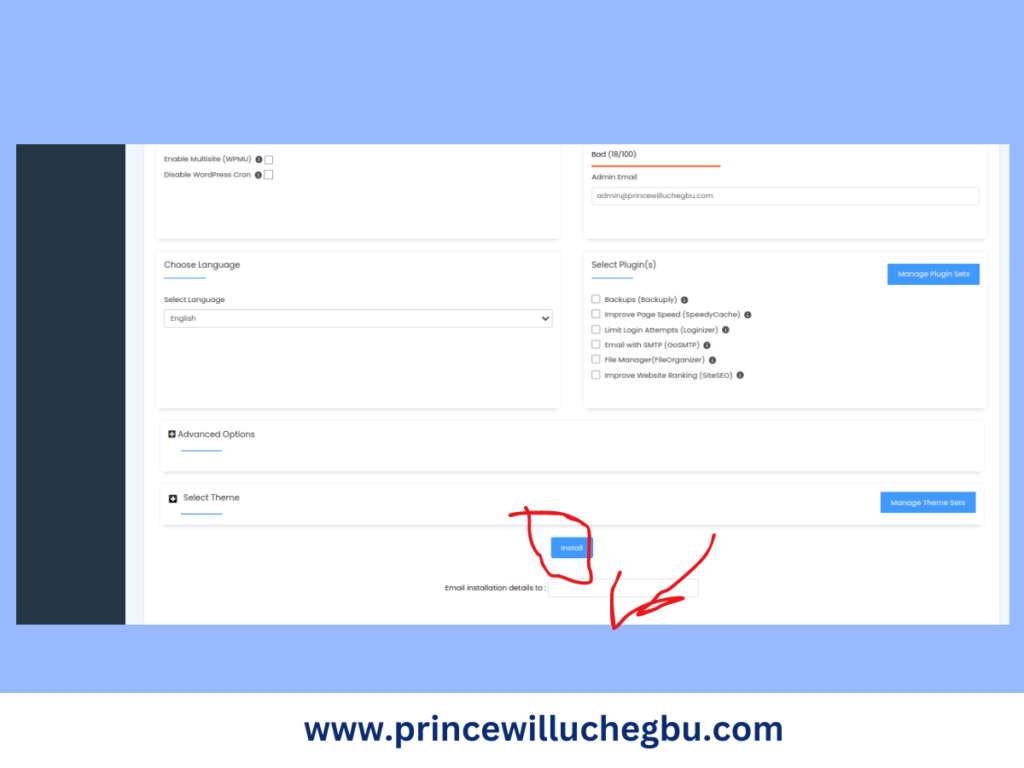
Once you’ve done so, enter your username, password, and email address for the installation details, and then click “Install.”
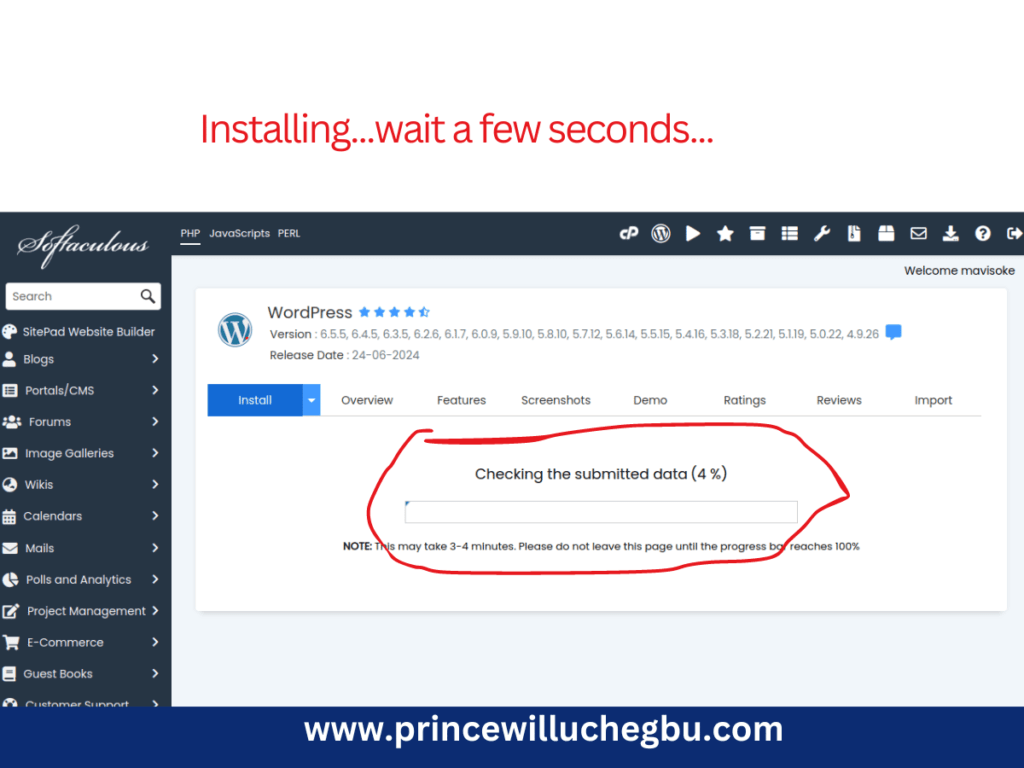
Wait a few seconds for the script to install.
Click on the provided URL, which is typically your website.com or your preferred extension, followed by /wp-admin.
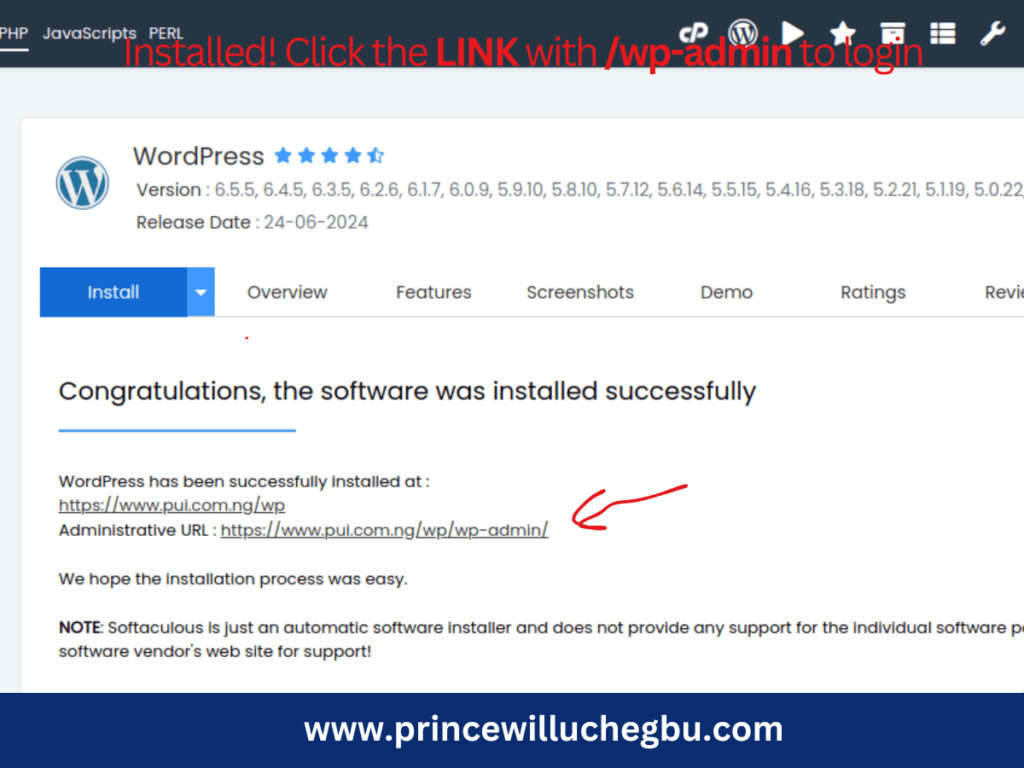
It will then ask you to log in, or log in automatically if you click immediately after installation.
Once you log in, the next step is to begin to build and customize your WordPress blog.
- Why He/She Left You To Be With Another Person After All You Did For Him/Her
- What To Do if Facebook Logs You Out of Your Account
- What SEO Is Not
Activating an SSL certificate
Open a new tab and return to your hosting account’s cPanel while still logged into your website’s WordPress admin dashboard. Locate “Let’s Encrypt” in the cPanel and run the script on your domain to ensure it is secure.
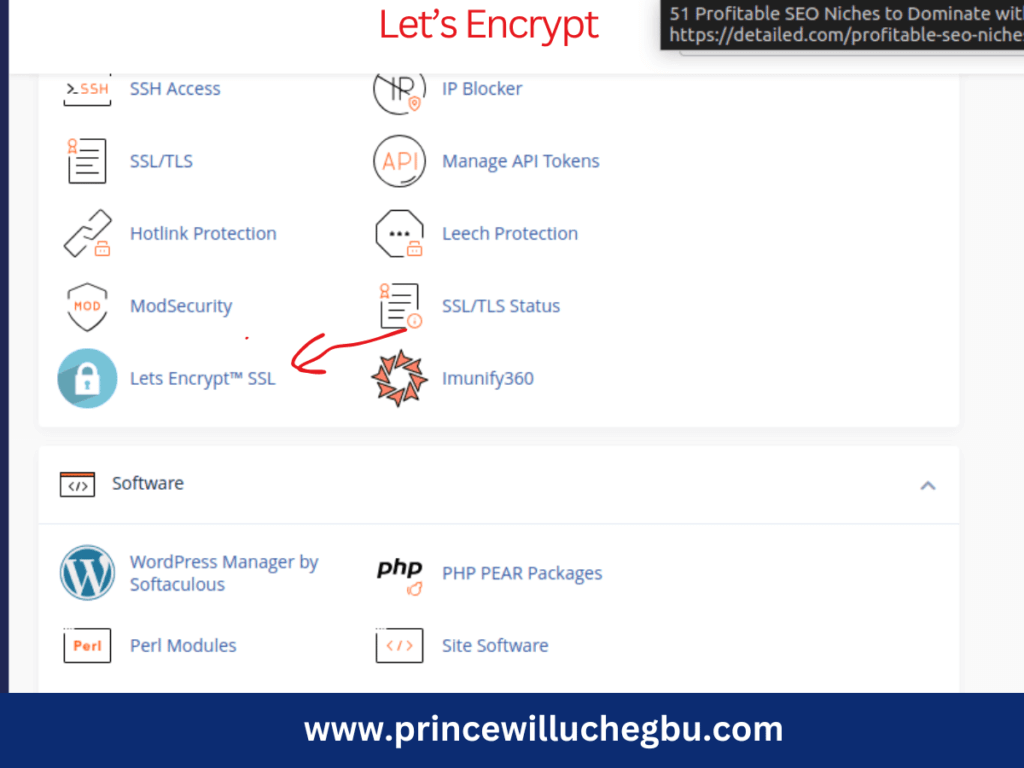
If you don’t do this, search engines may rank your website lower.
If your hosting provider doesn’t automatically add an SSL certificate to your domain name, you can contact them to do so.
Done? Proceed to the next step.
Designing Your Blog
Installing a WordPress theme
In WordPress, a theme beautifies the website by focusing on its structure and appearance, while plugins extend its functionalities. For example, after installing a WordPress script on a domain, all you have are blank pages. To add a contact form, you’ll need a contact form plugin. That’s a way of extending WordPress’s default function.
It’s like building a house. Even after the engineers complete their work, the house may not immediately reflect your desired aesthetic. You’ll need a home interior designer to handle the interiors and arrange things to ensure they look like what you’ve imagined. That’s the same thing with themes and plugins in WordPress.
To build or customize the blog, you’ll need to install a theme.
Blogging is a profitable career, if you follow the right blueprint. To get started, check out: How To Start and Make Money Blogging
For this guide, we’re going to build with the Kadence theme. There are many other themes in the WordPress theme repository.
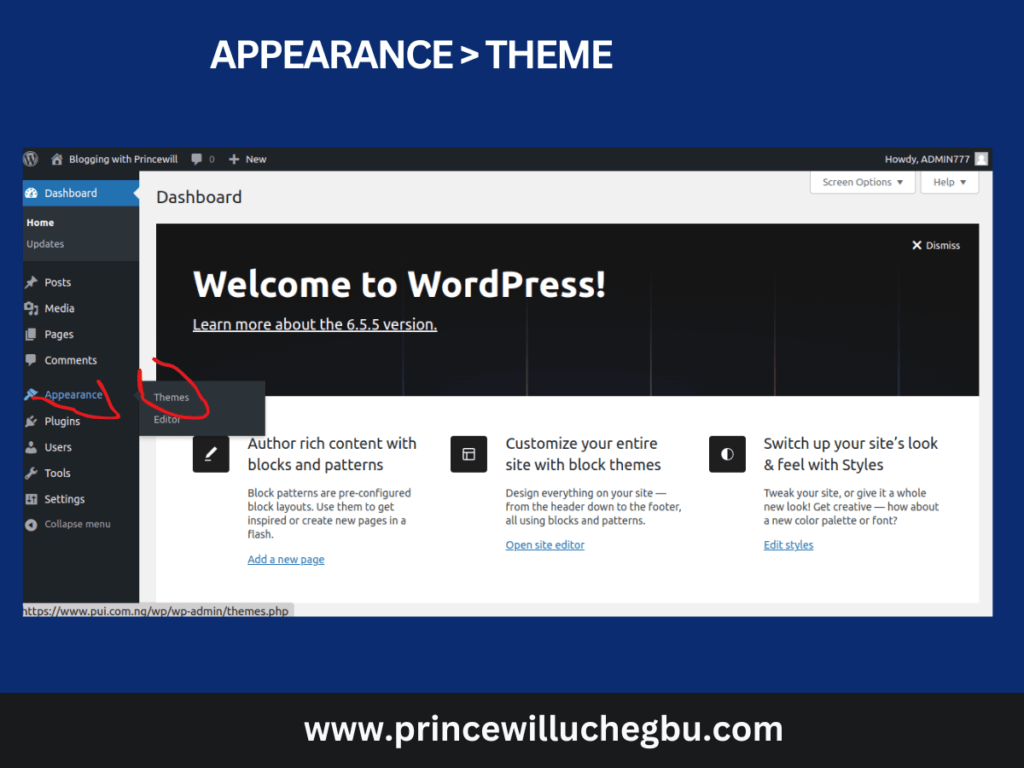
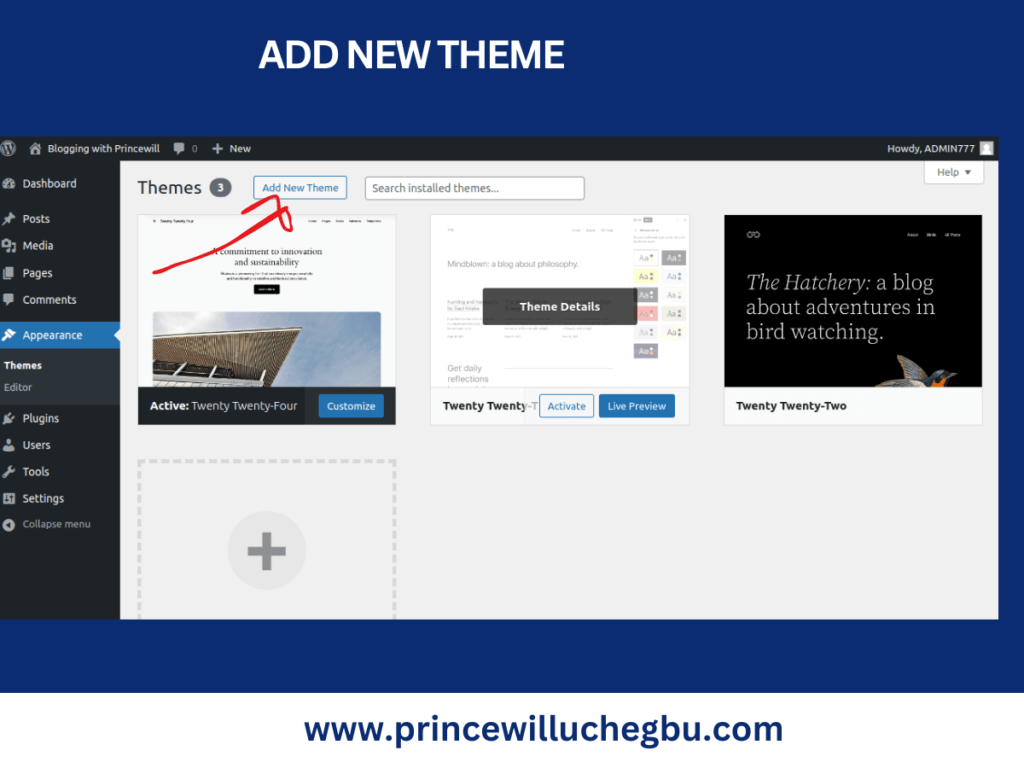
In the dashboard, go to APPEARANCE, click on THEMES, and search for KADENCE.
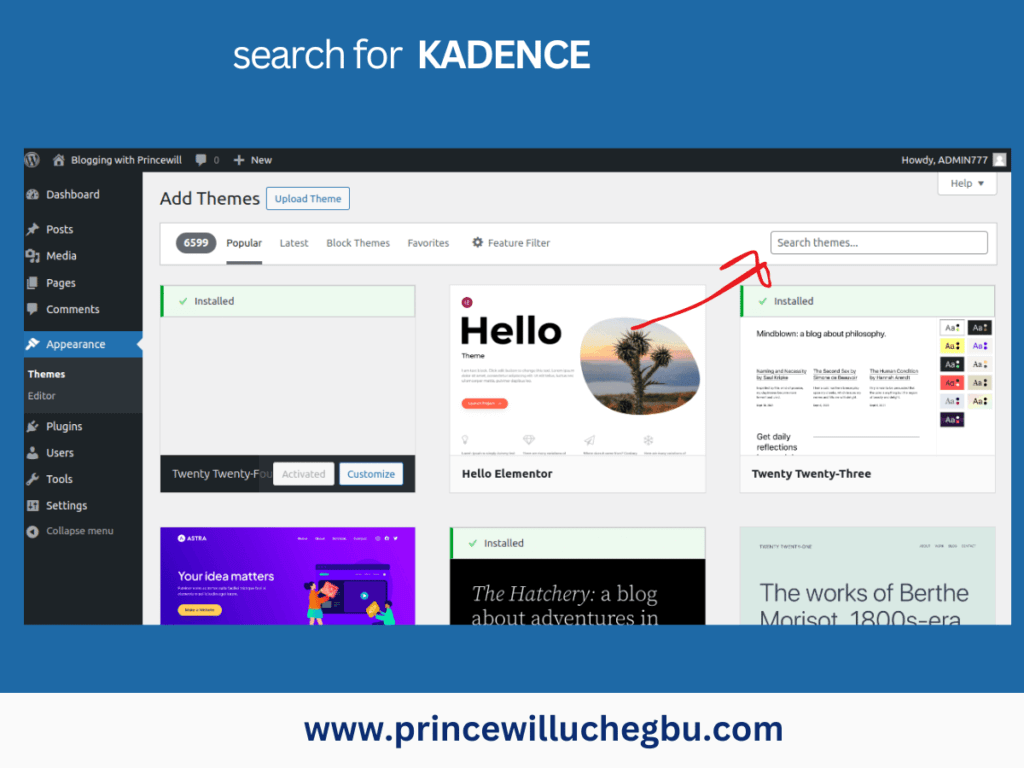
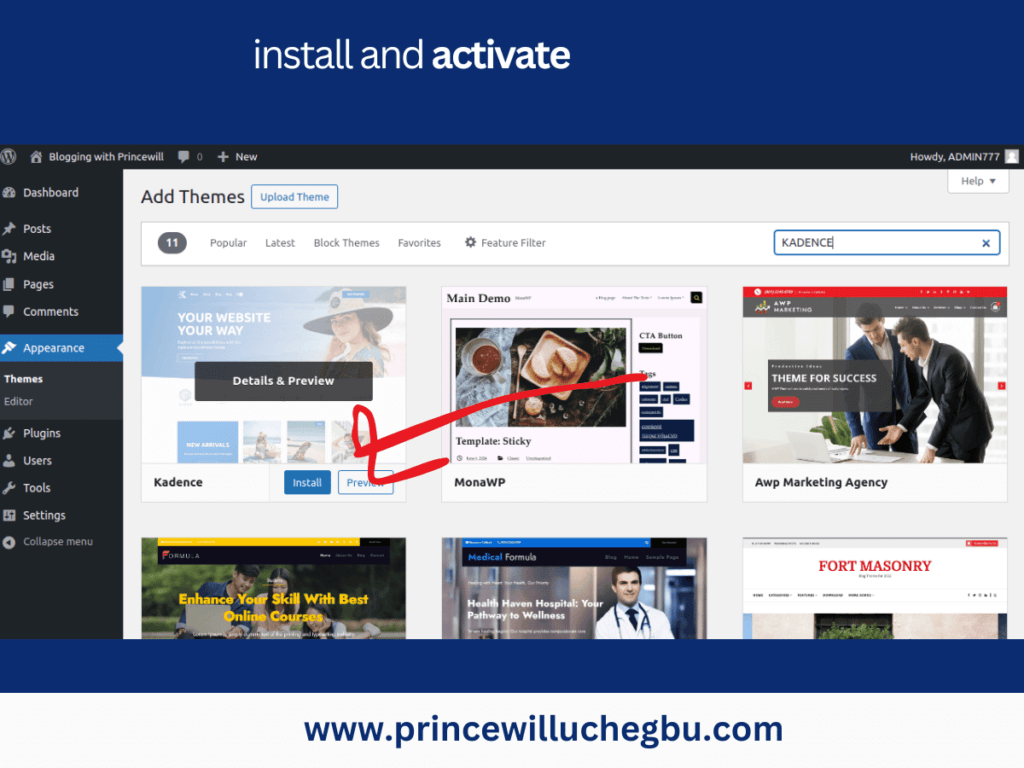
Click on INSTALL. Then, ACTIVATE.
If you go to your blog right now and refresh it, you’ll notice changes to the look.
The next thing would be to install the necessary plugins.
Installing WordPress plugins
To do that, navigate to the plugins section, clicking “Install New Plugins,” searching for each plugin, and clicking “Install” and then “Activate.”
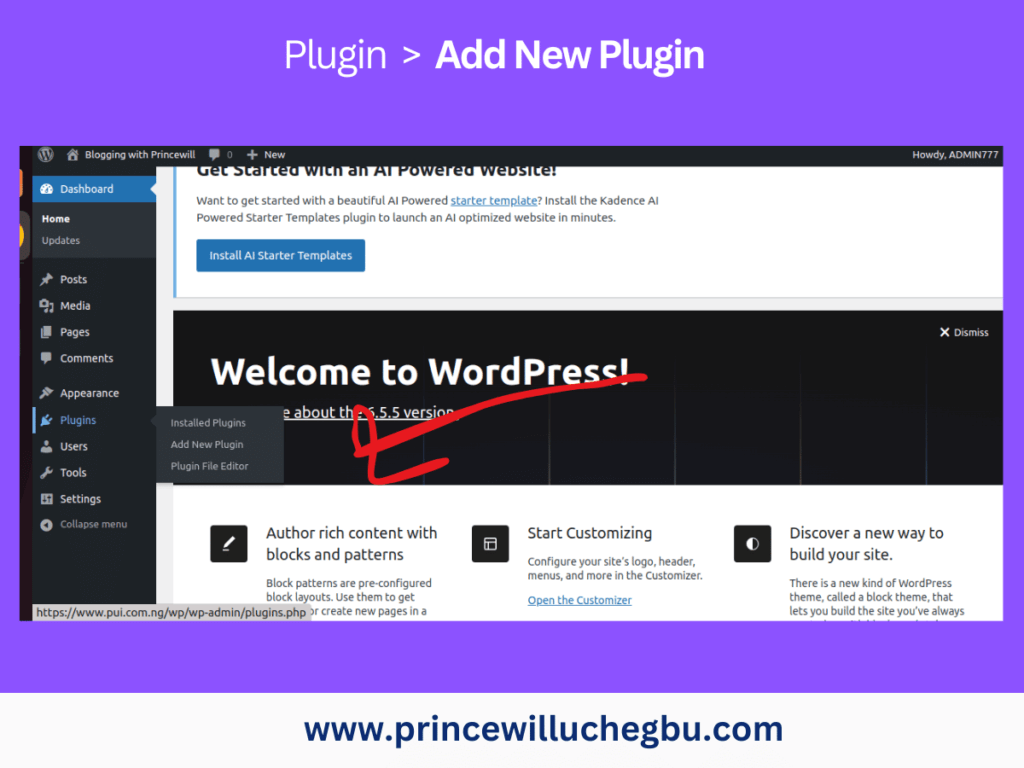
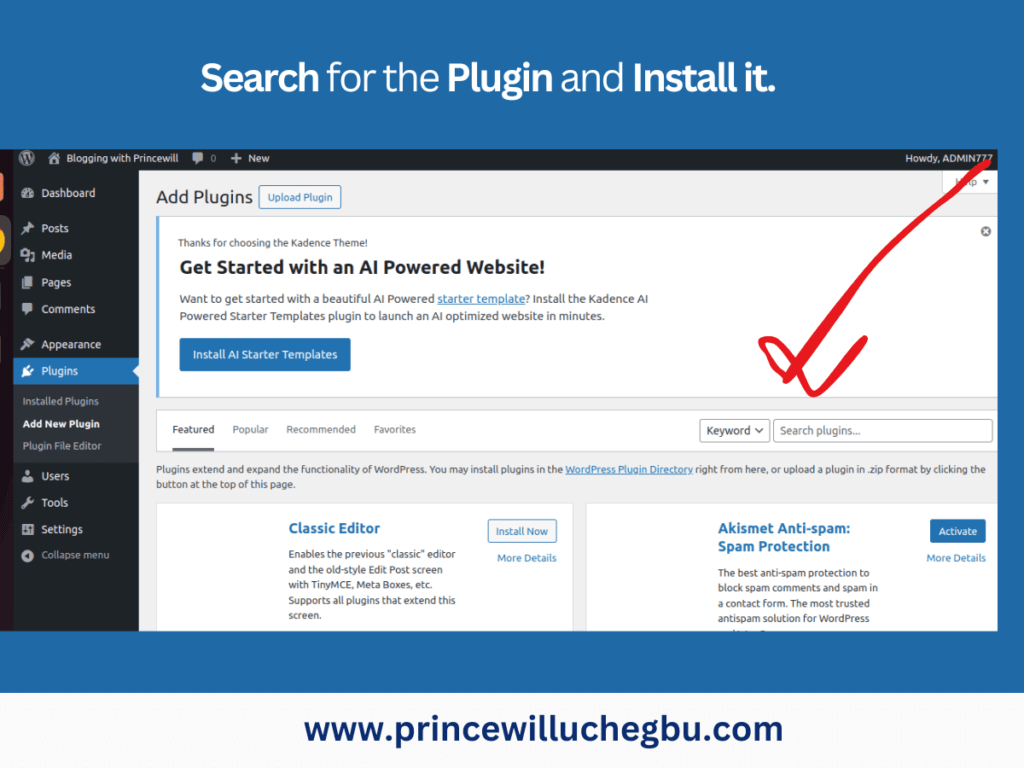
The following are the plugins we’ll need to install and activate:
- Rank Math SEO: For Optimizing Blog Posts
- Link Whisper: To suggest relevant internal links for published blog posts
- Easy Table of Contents: With this feature, you can add a table of contents to all blog posts. It is helpful to users for easy navigation of content.
- SpeedyCache: To improve the blog’s loading time and speed.
- TinyPNG: To compress the size and weight of blog images
- WPForms Lite: To build the contact form.
After activating the plugins, modify their settings to align with our requirements. Next, customize the blog’s appearance using the Kadence theme, which allows you to build pages with a simple interface.
Creating the Relevant Pages and Categories
We will now create the essential pages for our blog:
- Contact
- About
- privacy policy
- disclaimer.
To do this, go to “Pages” and click “Add New.” Add the page’s title and click publish.
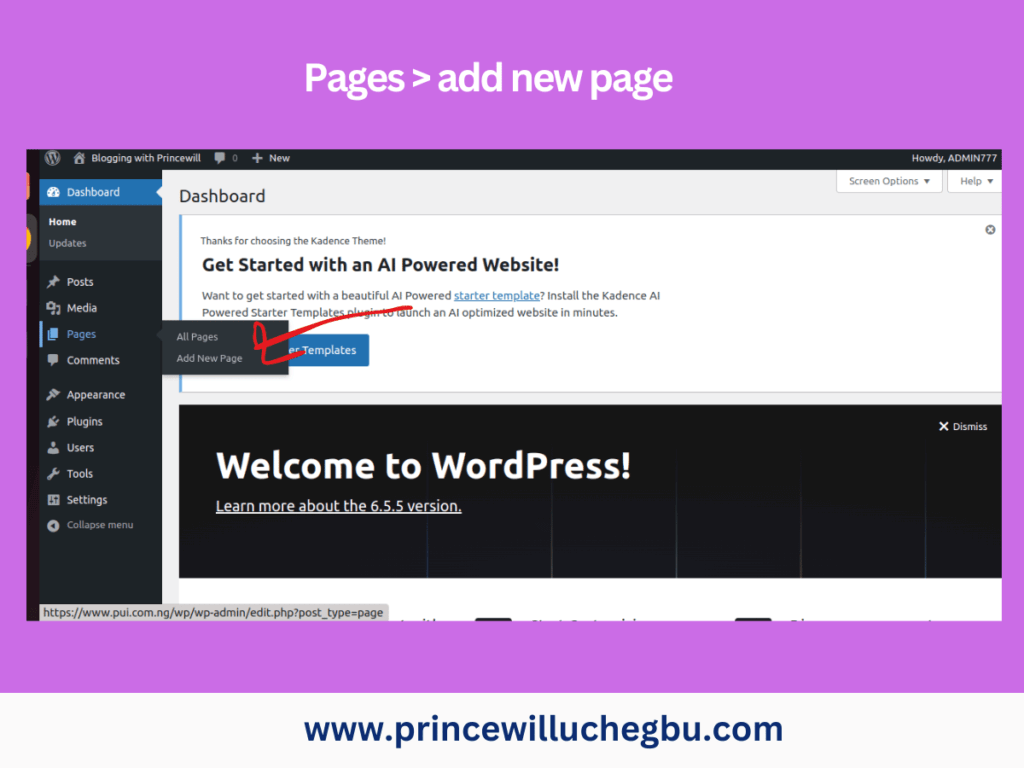
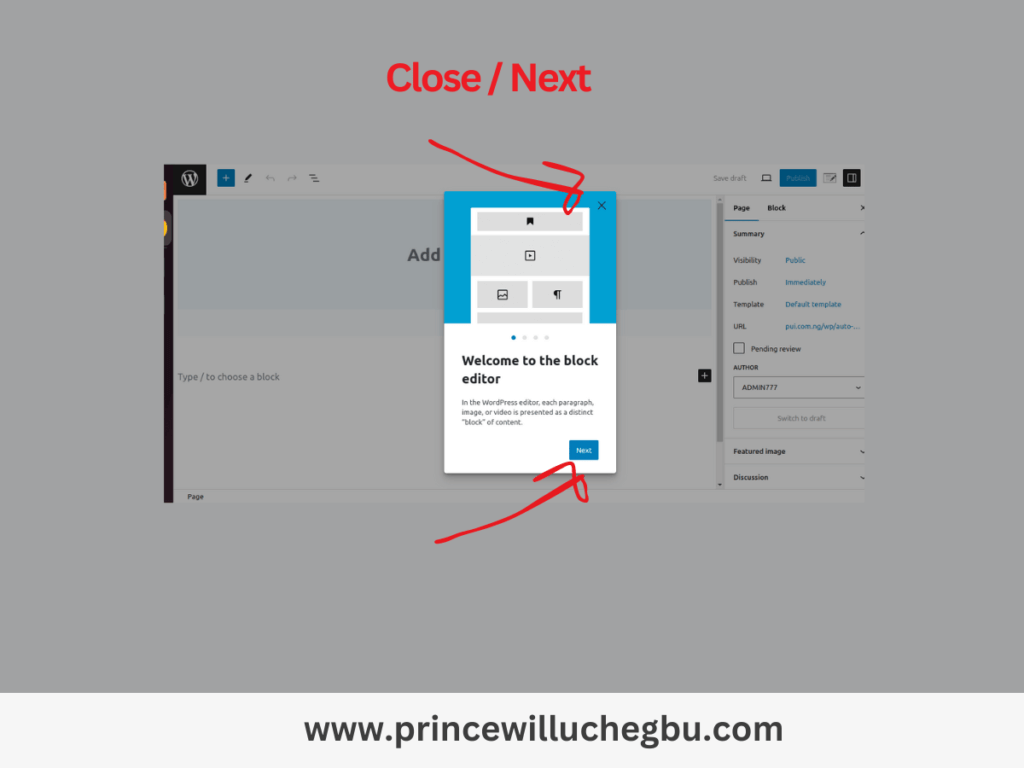
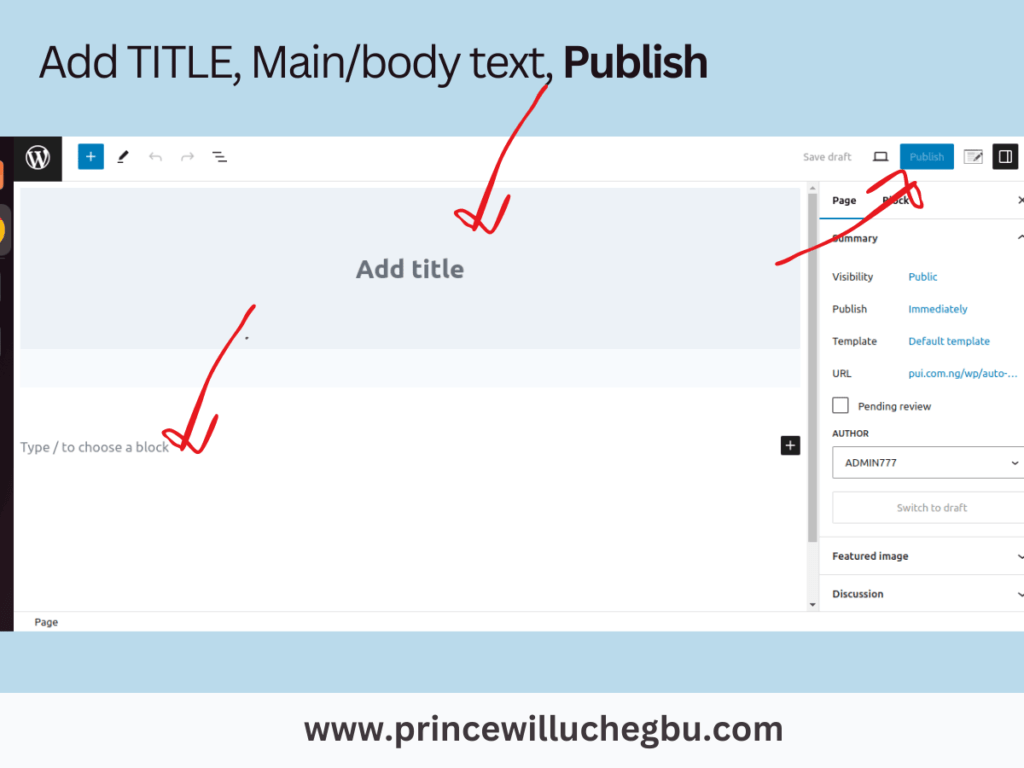
Repeat the same process for all the pages.
Once you have created the About, Privacy Policy, and Disclaimer pages, go ahead and write the content for them and paste it on their respective pages. You can use generative AI, such as ChatGPT, to generate the content of the disclaimer and privacy policy. Simply use this prompt:
“I’ve a blog dedicated to [your blog niche and what it will focus on talking about]. Generate the [privacy policy or Disclaimer] page content for me.”
Copy the output from ChatGPT, modify it to suit your desires, then paste and save it on the page.
For the category pages.
Go to Posts.
Click on the category.
Add the category, slug, and create.
Repeat the process to create all the relevant categories you may have.
Blog categories are simply the different core topics you’ll be covering in your blog. For example, a business blog might decide to talk about Marketing, Finance, Sales, etc. Now, in each of those areas, there are different things the blog owner could talk about.
Marketing, Finance, and Sales, therefore, become categories covering the different main topics.
To put it another way, the blog’s Marketing category would house ALL MARKETING-related content. This is important for organization, SEO, and the user experience.
With that, a user who clicks on MARKETING will be provided with all content relating to MARKETING, excluding other content from FINANCE and SALES.
After creating the pages and categories, it’s time to build the blog’s menu.
Building Your Blog Menu
Go to “Appearance,” click “Menus,” and then click “Create New Menu.” Give it a title, select the relevant pages (Home, Contact, Blog, About) you want to appear in the header menu, and save it. Next, choose the HEADER MENU location. Open your blog in a new tab and refresh it to confirm that the pages appear correctly.
Go back to the MENU. Select all the CATEGORY pages you’ve created and click on ADD. It should appear on the list of menus.
Drag each of the menus left to be added to the heading of your blog. See the screenshot below.
Once you’ve done that, visit your blog in a new tab and refresh the home page. You will see all the categories shown in the header.
If you want to have a subcategory under a category, this is how to achieve that.
For example, a business blog might decide to talk about Marketing, Finance, Sales, etc. Now, in each of those areas, there are different things the blog owner could talk about. The blog can decide to have subcategories for the Marketing category, such as:
MARKETING > Facebook Marketing > Instagram Marketing > YouTube Marketing
Facebook, Instagram, and YouTube marketing categories will then have to come under marketing, and when a user clicks on each, the user will be presented with content filed under that particular category alone.
To achieve that hierarchy, create the different categories. Then, go back to the menu section under Appearance.
Drag each of the subcategories under the primary category. In the scenario above, drag Facebook, Instagram, and YouTube under MARKETING.
Creating the Footer
The footer of your blog is the bottom appearance of every blog/website. If you go through different blogs on the internet, you’ll notice different styling for them. But we won’t do much to avoid confusion.
Go back to the menu in the WordPress dashboard.
Create a new menu for the FOOTER.
Then, select the other pages (Privacy Policy, Disclaimer) and add them. Also, click on the button to make the menu appear in the footer section of your blog. Done? Save it. Go to your blog and refresh to see that it’s showing.
Good!
Changing the blog Logo and others
To further customize your WordPress site, go to “Appearance” and click on “Customize.” Here, you can change the color, style, website logo (header logo, site logo, and site tagline), and footer copyright. The “Customize” option allows you to adjust many aspects of your blog’s appearance.
You can play around with those functions to see what they look like. If you make any change that’s worth saving, you must hit the publish button to save it; otherwise, it will not be saved.
Installing WordPress Rankmath Plugin
If you’ve not installed the plugin from the previous instructions, do this:
Go to “Plugins,” click “Add New,” search for the plugin, then click “Install” and “Activate.” Follow the steps to connect it to your Google Search Console, which enables Google to index your content when you publish.
The RankMath plugin is an SEO plugin that helps ensure that your website is constantly visible to search engines and that your content meets basic SEO requirements.
Once installed, click on “Settings” and follow the instructions. Choose the beginner option to use default settings. Connect RankMath to Google Search Console and Analytics to monitor website traffic and user behavior.
To submit your site to Bing, go to RankMath, click on “Webmaster Tool,” and then follow the link to connect to Bing.
Installing Site Kit by Google
Google Site Kit helps bring the report from your Google Search Console and Analytics directly to your WordPress dashboard. This makes it easier to monitor your site’s performance in one spot.
To install, click on Plugins.
Add New. Search for it and install/activate it.
Follow through with the instructions to get it connected to Search Console and Analytics.
Congratulations! Your blog is ready to start publishing. Check out the next publication on Writing Your First Blog Post to write and publish your first post.
If you’ve any challenges, do not forget to ask in the comment section, and I’ll personally attend to you.
FAQS | Building Your WordPress Blog
How Do I Make My WordPress Blog Successful?
Your success hinges on the quality of traffic you receive. So, keep it simple. Don’t try to build a complicated WordPress blog, especially if you’re a beginner. As an expert, I highly recommend using a WordPress theme that is light in weight to avoid slowing down your website. Then, create good content on issues people are constantly searching for.
How Do I Grow My WordPress Blog?
Write good content on topics users are searching for on search engines like Google. Once your WordPress blog is launched, start banking the tiny little traffic you’re having. I would also advise that you think of building a community around what you blog about, especially now that generative AI impacts search.
Do WordPress Blogs Make Money?
Yes, you can make a lot of money through your wordpress blog using any of the monetization methods I discussed previously. The more quality traffic you generate, the more money you can make. Traffic equals money in blogging.
How Do I Make My WordPress Blog Look Professional?
Have the blog header and footer well arranged. Ensure to have the relevant pages like contact page, about page, disclaimer and privacy policy pages. Then, use a good color combination that represents and resonates with your brand. Never forget that simplicity is the highest form of professionalism.
How Many Followers Do You Need on WordPress to Make Money?
This will depend on how you intend to make money from the blog. If you want to sell your personal products like online courses or provide direct services, you may not need everybody. But if you want to make a lot of money, then you need a lot of traffic. The more traffic, the more money you make.
How Do I Increase Views on WordPress?
Your content should be well-optimized, drive traffic from other channels like social media, forums (quora, facebook, youtube, etc.)
How Do I Optimize My WordPress Blog?
Make sure you’ve the primary keyword in the title, subheadings and most importantly, sprinkle other related keywords across your blog post.
How Do I Maintain My WordPress Blog?
Constantly update the plugins and theme. I advise that you turn on automatic plugin updates so it can update itself even when you’re too busy to do so.
Why Is My WordPress Blog So Slow?
It could be that you’ve too many plugins, images of different sizes and weight or that your hosting account bandwidth and storage capacity is low. To be on the safe side, make sure to use a few plugins and only when relevant. Deleted all inactive plugins and themes. Lastly, resize and compress all your images before uploading them to your blog.
Final Thoughts
While building your WordPress blog isn’t rocket science, it’s neither a bed of roses, especially as a beginner. For me, it might take me less than 20 minutes to be done setting up the WordPress site. This, however, may not be the case with you.
So, my advice to you is to be patient. You might need to go through this more than twice to fully grasp it.
Furthermore, if you’re thinking of starting a successful blog, pay attention to search engine optimization. Learn it. When you write your first blog post, share it on social media to create some form of buzz.
Lastly, the hosting plan you choose from any of the hosting companies has a significant impact on your wordpress website overall performance. A hosting account with small bandwidth and storage space and cause your website to load slowly as well as the wordpress theme you choose. pay keen attention to them.


