How to Start a Beauty Blog for Free [Expert Guide]
Blogging is a money-printing business; unfortunately, many people become discouraged after publishing their first ten blog posts.
So, if you want to learn how to start a beauty blog for free, you’re on the right track, but you should be aware of the herculean task ahead.
First, you need to be able to write good content. Not necessarily like William Shakespeare, but clear enough for readers to grasp the information you’re conveying.
Second, you need to have a content strategy. This defines how you run the blog. Remember that even though you’re starting the beauty blog for free, you don’t want to do it haphazardly.
A content strategy looks at things such as:
What type of blog post to publish.
How often you want to publish blog posts and the total number weekly/monthly.
How to drive visitors to the blog aside from relying on search engines.
Among other things.
Most importantly, play the long-term game.
Blogging isn’t a get-rich-quick scheme, even though you can start a blog today and make hundreds of thousands of dollars in the next 30 days.
For me, I like to give myself at least 6 months to know the next big step. But even before those six months, I track every metric, such as impressions and clicks, to ensure I’m consistently working towards the larger goal.
How to Start a Beauty Blog for Free [Expert Guide]
Choose a Beauty Niche, a Domain and a Hosting Account
When it comes to blogging, the niche matters a lot. If you make the mistake of choosing the wrong niche or choosing just any niche simply because you are passionate about it, then you are in for a wild ride.
The first thing you must consider when choosing a niche for the beauty blog is the monetary value of that niche.
That is, are there advertisers willing to advertise products in that particular niche? Are products in that niche selling massively?
Secondly, are there people actively searching for things in that niche? For this, you’ll need to do keyword research using SEO tools like SEMrush, Moz, Ubersuggest, and even the free version of Google Keyword Planner.
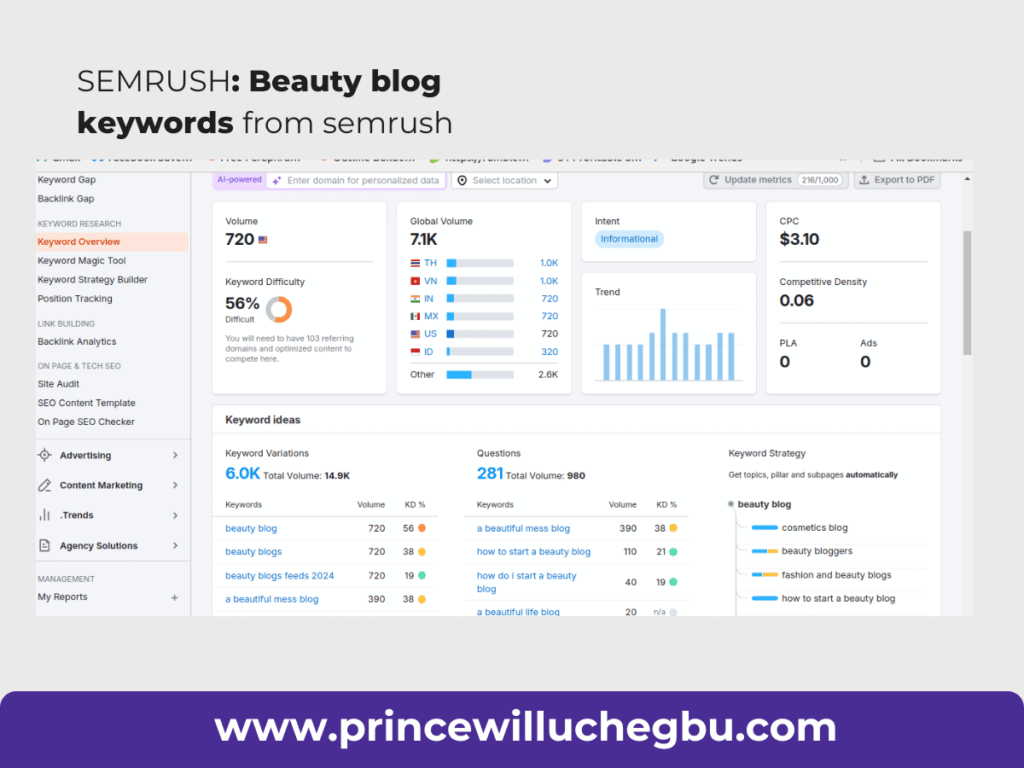
With these tools, you will be able to see the estimated number of people searching for that industry each month. You could even narrow it down to different countries to see how they perform.
In choosing your domain name, you need to be a little bit futuristic. Think about Amazon. Imagine if Jeff Bezos had used a name like TheBookBookSeller when the brand initially focused on selling books online. What do you think would have become of the brand now that it has diversified fully into tech? I guess a name change would have been necessary, which would have cost a lot, aside from the fact that they might not have been able to immediately transfer their credibility from Amazon to any new names they considered.
So, when choosing a domain name, think about the future of the brand. If there’s even a slight chance of pivoting or diversifying into other industries, you might want to keep the name neutral. Instead of beautyblogger.xyz, you could choose a name that doesn’t suggest any particular industry.
Another principle for choosing a domain name is using a suggestive name—a name that hints at what your blog is all about.
Join Princewill Uchegbu’s Whatsapp Community to Interact and Receive Weekly Updates on Tips, Tricks, and Strategies for Business and Life. Click here to Join.
As I explained about the benefits of using a non-suggestive name, a name that suggests what the brand is about also comes with its benefits, especially for SEO.
Aside from SEO reasoning, users searching for beauty blog-related content are more likely to click on a domain that says thebeautyblogger.xyz than Ajuzn.xyz. And I’m sure you can easily guess why!
Hire Us: Let my team build your blog in just 7 days. We handle everything—from choosing the best domain name, registering it, and hosting, to creating a professional-looking blog that Google and other search engines will love. Get started now!
Furthermore, your domain name should be short, easy to spell, and easy to pronounce. Avoid complicated names, especially if you’re serving a global audience. Of course, there is room for using cultural names.
Once you’ve come up with an acceptable name—a name that suits your needs—the next phase is to confirm that the name is available for registration and to get a hosting account.
For the hosting account, focus on getting hosted by a company with a 99.9% uptime, good bandwidth, and customer service. I’ve done a detailed guide on HOW TO REGISTER YOUR DOMAIN NAME and choosing the best hosting company. You should check those two publications out.
Install WordPress
WordPress is undoubtedly the most popular and easy-to-use web content management system out there. Not to be forgotten, it’s used as a website builder by 62.8% of all websites on the internet. That’s huge!
Once you’ve purchased your domain name and hosting account, you’ll be given cPanel access.
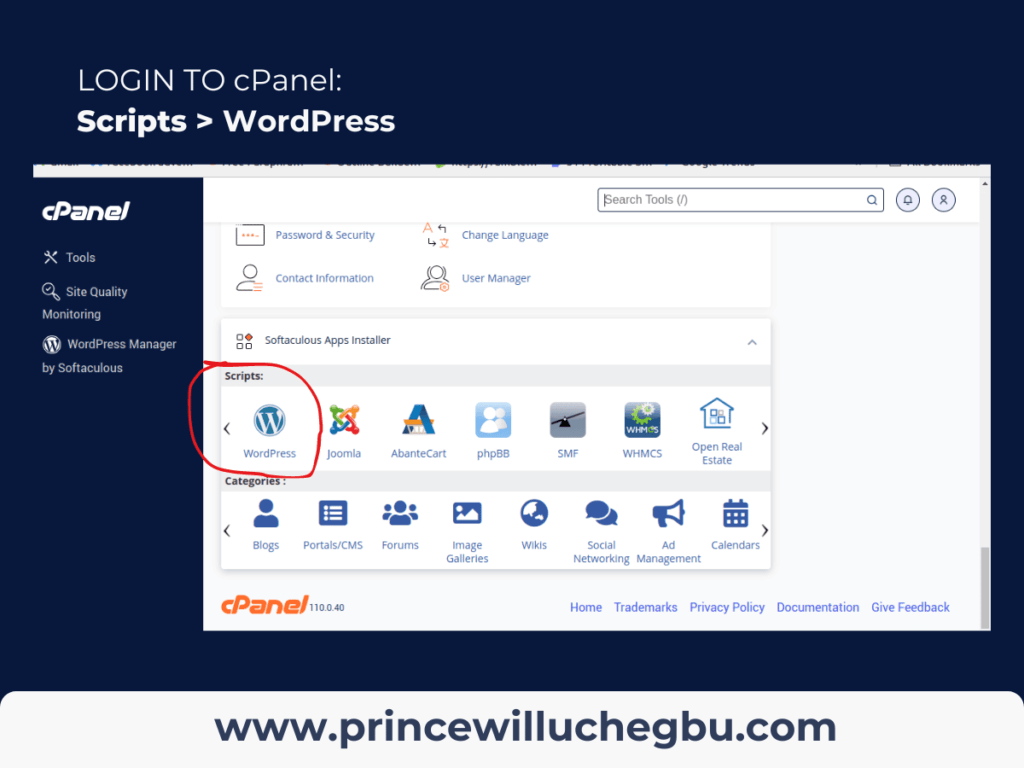
To install WordPress, quickly log in to the cPanel from the hosting company you bought from.
Scroll down to Scripts > click WordPress.
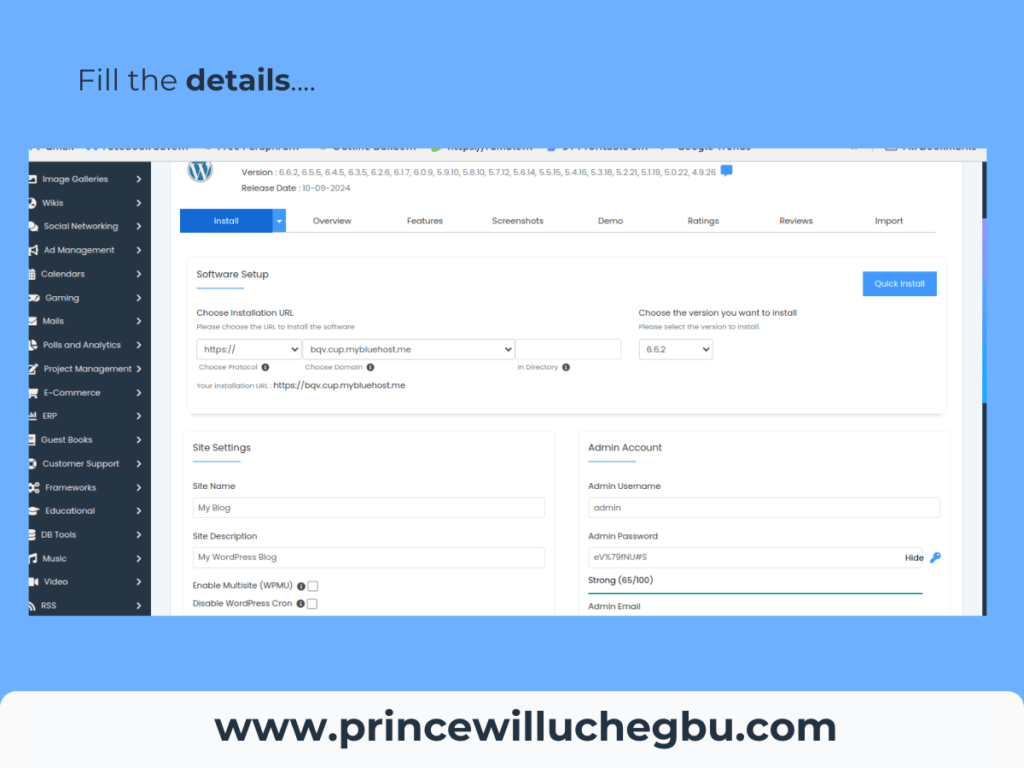
Then, input the necessary details:
- Blog name
- Slogan
- Select the URL (https or www.https are preferred).
- Choose your password and username—use something not easy for hackers to remember. Avoid using your name or website name.
- Enter your installation email and where you want the system to send your login details.
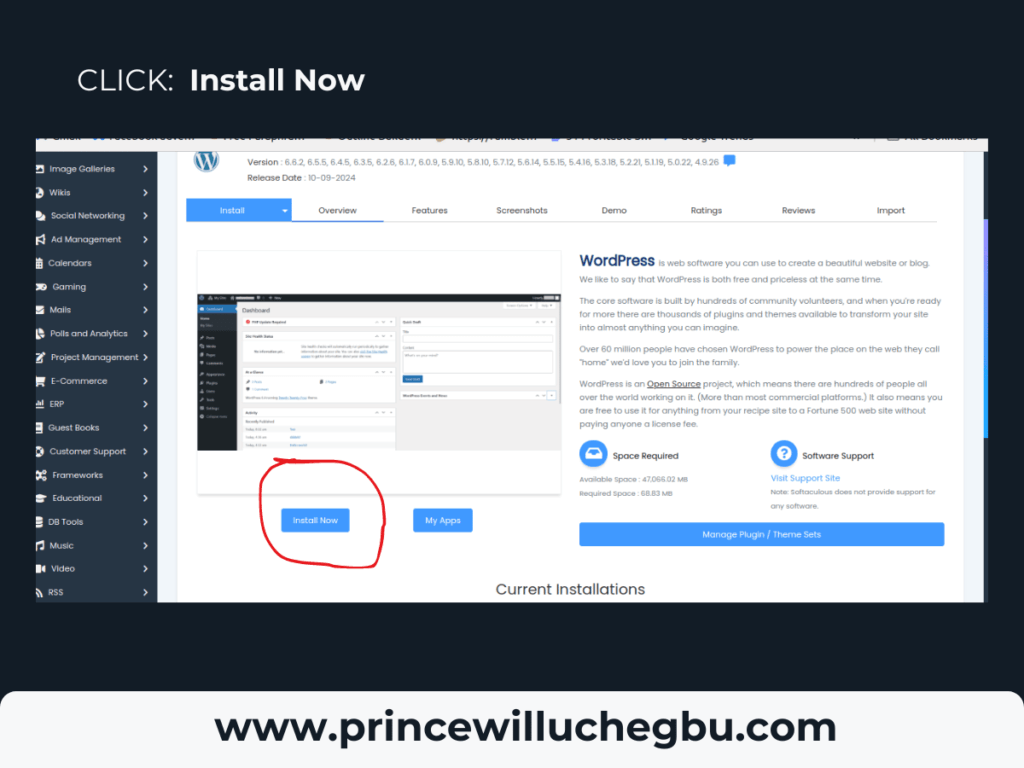
After that, click Install Now.
This will take you to a different page with a congratulatory message, including instructions on how to access your WordPress dashboard. You’ll also receive the same information at the email address you provided for the installation.
If, for whatever reason, you forget the login URL, simply type your blog URL and add /wp-admin at the end. This should take you to the login page for your WordPress blog admin dashboard.
ProTip: If you find this challenging, you can hire my team, and we’ll build a professional blog for you. Alternatively, you can reach out to the company from which you bought the hosting account; they should be willing to help install the WordPress script on your domain name.
Select a WordPress Theme
There are thousands of themes in the WordPress ecosystem; some are free, and others are not. A theme helps to beautify your blog. To select a theme, go with a theme that’s lightweight and fits what you want. For this, we’re going to use the Kadence theme.
To install the theme:
Go to Appearance > Theme > Add New Theme.
Search for Kadence.
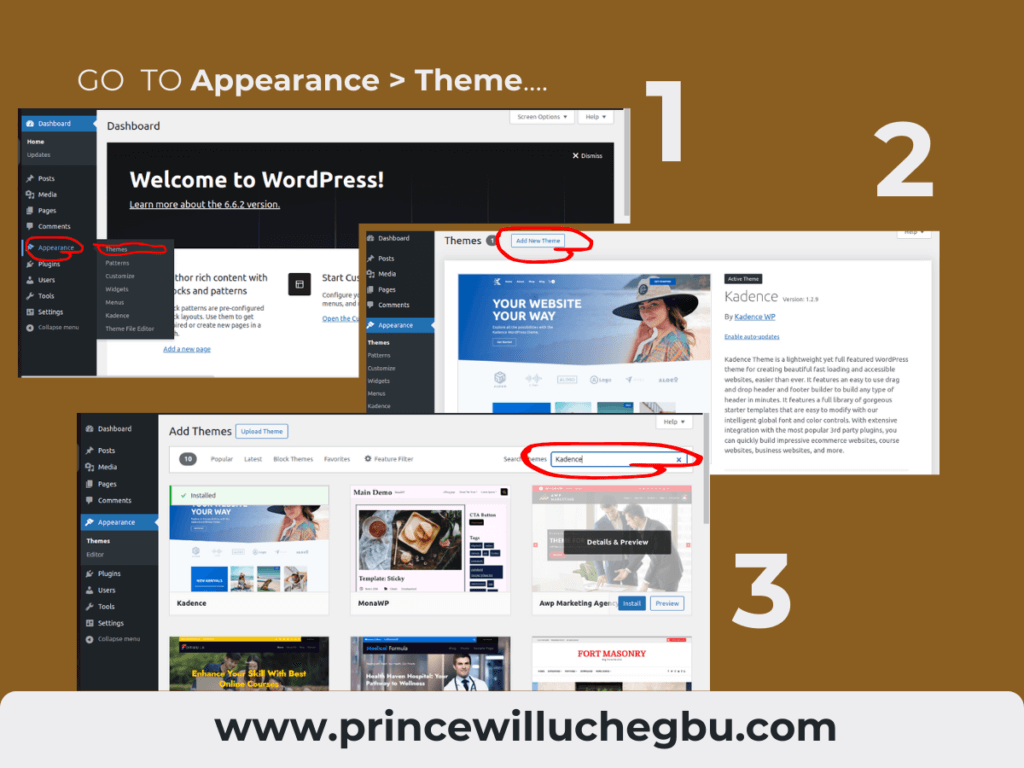
Click install. Then activate.
Creating Relevant pages
Basically, there are four important pages your blog must have. These pages are the About, Contact, Disclaimer, and Privacy Policy pages.
To create these pages and any other page, ensure that you’re logged into your WordPress admin dashboard.
Once you’re in, go to Pages and click on Add New Page.
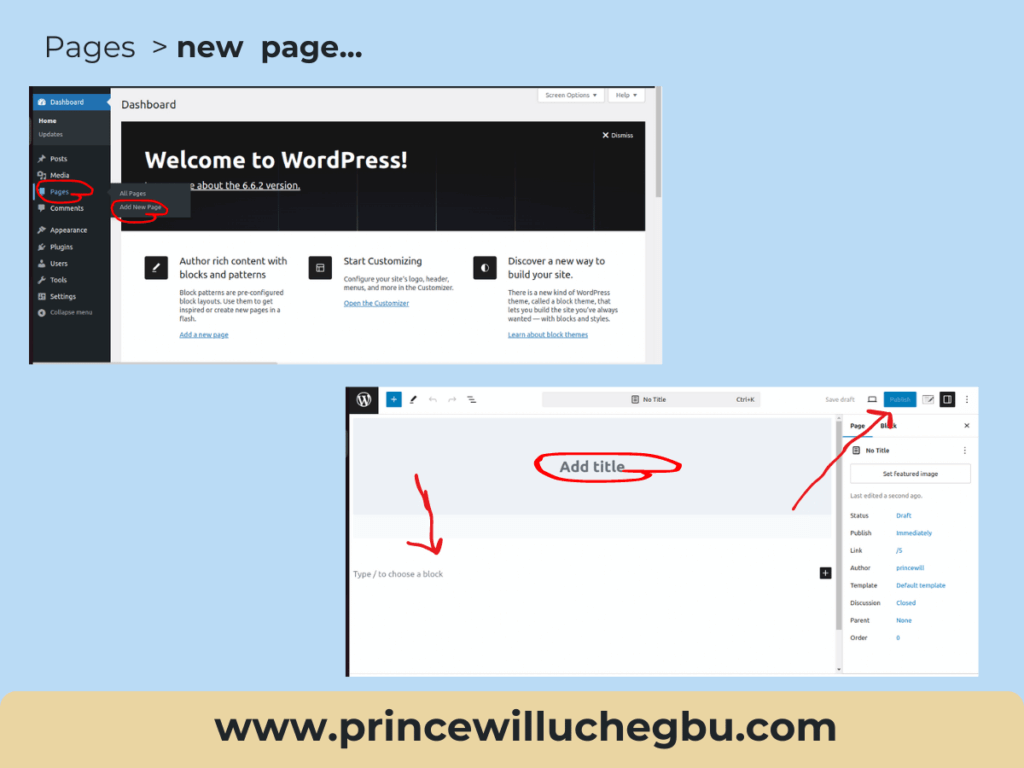
When the page opens, where it says Add Title, that will be the title of the page. For this example, we’re going to create the About page, so I’ll just enter “About Us.”
Below that, you’ll see “Type / to choose a block.” This is where you add the content for the page.
To save time, you can write what your blog is about on any writing application and copy and paste it on this page. Alternatively, you can use AI to generate the content to save even more time. If you choose to use AI, make sure to edit it to match your writing style.
Once you have added the content, look to the top right corner, and you’ll see the Publish button. When you’re ready, click Publish again, and the page will go live.
You can follow this same process for other pages like the Contact page, Disclaimer page, and Privacy Policy page. If you have additional pages you’d like to include, you can create them in the same way.
If you need to make changes to the content of any page after it’s created, hover over Pages and click on All Pages. This will display a list of all the pages on your blog. Find the page you want to edit and click the Edit button. The page will open, allowing you to make and save your changes.
Customize Blog Settings
To customize your blog, ensure that you are logged into the WordPress admin dashboard. Once you’re in, the first thing you need to do is go to Settings and click on General.
Under General, you’ll see options like Site Title, Tagline, Site Icon, and more.
The Site Title is simply the title of your blog.
The tagline is the slogan for your blog, so make sure you use a descriptive tagline.
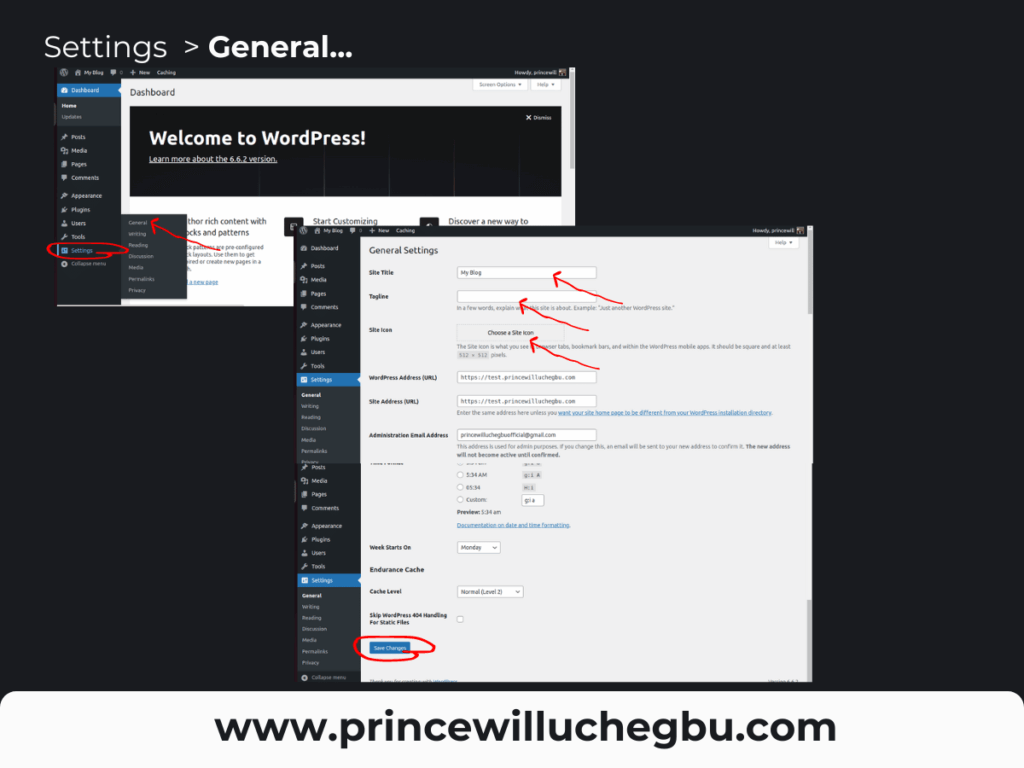
The Site Icon is your site logo, which should be 512×512 pixels. If your logo is larger, you can use an online resizing tool to adjust it to this size. Click on Choose a Site Icon. You will then be prompted to choose from the Media Library or Upload Files. Select Upload Files and locate the file on your PC. Once the file is uploaded, it will load, and you should be able to insert it. After it loads, it will be selected, and you’ll see the option to Set As Site Icon. Click it, and the logo will be added as your site icon.
Next, go back to Settings and click on Reading.
Under Reading, you’ll see Your Homepage Displays. Choose Your Latest Posts and ensure it is selected. Then scroll down to Search Engine Visibility and ensure that the box is unchecked. If it is checked, search engines will be discouraged from crawling and indexing your site. This, in most cases, will prevent your beauty blog from showing up in search results. Once all changes are made, click Save Changes.
- Want to Make Money from your Passion? Here’s How to
- Expert Revealed: How To Make Money Blogging in 2024 (18 Proven Ways)
- How Long Does It Take To Make Money From Blogging
Next, go to Settings and select Permalinks.
Under Permalink, scroll down to Permalink Structure and choose Post Name.
This means that your post URL will only display the post name rather than including the date or other information. After selecting this, click Save.
To further customize your blog, go to Appearance and click on Customize. This will open the Customizer.
The first thing you’ll see is the Colors and Fonts section, if you’re using the Kadence theme, if you’re using a different theme, the settings may vary slightly.
Navigate to the Footer and click on Copyright. As you can see, the copyright might show something like “Copyright 2024 “Name of your Blog” – WordPress theme by Kadence WP.” The text “My Blog” appears because that is the current title of my blog. Whatever you set as your blog’s title will appear there. You can delete the Theme Credits to remove the theme information, leaving only the copyright, year, and blog title. Click Publish to save your changes.
To add a navigation menu to the footer, click on Footer Navigation under Appearance. Select the menu you want to display, such as the About section, and click Publish.
For the header, you likely already have a logo set, so there may be no need for changes. If you need to adjust the menu, go back to the WordPress admin dashboard, go to Appearance, and click on Menus. Enter a name for the menu, such as Primary Menu, and click Automatically Add New Top-Level Pages to Menu. Then, click Create Menu. Ensure you check the box for Display Location: Primary, which will place the menu in the header section of your blog. Once done, click Save.
To add items to the menu, look to the left where it says Add Menu Items. Click View All to see all your pages. Select Home, About, Privacy Policy, Disclaimer, and any other pages you’ve created. Then click Add to Menu, and they will appear under the primary menu section. Click Save Menu. If you visit your blog now, you’ll see that the selected menu items are displayed in the header.
The next step is to create category pages. In blogging, categories help organize your site and allow readers to easily find the information they’re looking for. Category groups have similar content under the same heading. As a beauty blogger, think of categories as a way to segment broad topics into smaller, more specific ones. For instance, you might have a category for Skincare and another for Haircare, with various related posts under each category.
To create the categories:
Go to post.
Click categories.
Add the name of the category. You can include a description. Then, click Add New Category.
Repeat the same process for the other categories.
When you’re done, go to Appearance.
Click menu.
Click Category.
Choose the categories you want to appear on the menu. Then, add to menu. Save.
Right now, if you go to your blog and refresh it, you should see the categories and the pages on the menu.
Pro Tip: Book a one-on-one 7-day Product Creation and Monetization Masterclass. Learn to create your digital product in 7 days and make a significant profit from it. We’ll jump on a call for 7 days, researching and fine-tuning your offer to appeal to your target audience.
Install Essential Plugins
Of course, there are so many relevant plugins you can have for your beauty blog depending on the variety of functions you want. But these few here should be just enough for the ultimate basic things you need.
- Rank Math SEO: A plugin designed to optimize your WordPress site for search engines by improving SEO settings and providing insights.
- Easy Table of Contents: This is used to insert a table of contents into your blog post.
- Site Kit by Google: An official Google plugin that integrates key Google services like Analytics, Search Console, and AdSense into WordPress.
- Webpushr Push Notifications: A plugin that enables push notifications for your website, allowing you to engage visitors with real-time updates.
- SpeedyCache: A caching plugin that improves your website’s performance by speeding up page loading times.
Installing and activating them is a pretty straightforward process.
Go to plugins.
Add new plugins.
Search for the plugin and click install/activate.
Once you have done that, follow the instructions the plugin gives to customize it. Easy-peasy!
Plan and Create Captivating Posts
When you want to start creating your blog post, the first thing you need to do is plan for it. You don’t just wake up and start creating a blog post. Instead, take some time to sit down and think about the different topics you’ll be writing about. Also, ask yourself how frequently you want to post.
Once you’ve determined all of that, the next step is to do keyword research to find out how many people are actually searching for those topics and in what volume. You also need to consider how difficult it will be for you to rank for that particular blog post. It’s not enough to simply want to write; you need to ensure that you’re not competing with the giants in the industry. You want to target keywords that aren’t overly competitive. That’s the approach for creating blog posts. Once you’ve discovered these things, you can build your content brief and then begin producing your content.
Personally, I usually brainstorm the entire content for every month at once so I don’t run out of blog post ideas.
Promote and Expand Your Beauty Blog
Usually, search engines like Google account for a large chunk of web visitors, but it’s not enough to rely 100% on search traffic, especially as a beginner. You want to diversify your traffic channel just in case you fall out of favor with search engines.
One effective method is to establish a presence on forums like Quora, Medium, and Nairaland, among others. Create an account on these forums, and whenever you publish a blog post, summarize it and share it on these platforms with a link to the original post, directing people to read the full article on your blog.
You can also deploy this method on social media. As a beauty blogger, instagram and other social media platforms can serve you adequately. Imagine having a following of up to 100,000; with that, you can be assured of more than 30,000 visitors monthly.
Having a presence outside your blog also enhances your blog recognition and improves ranking on search engines.
Make Money With Your Beauty Blog
Making money from blogging is often considered the holy grail of the blogging world. Everyone wants to monetize their blog. Generally, as a blogger, there are several ways you can make money. One method is through ad networks, such as Google AdSense. Once you meet the requirements and are approved, you can place the AdSense code on your blog. When visitors come to your blog and view or click on the ads, you earn revenue.
Another option is to use other ad networks like Monetag, Adsterra, Media.net, AdThrive, or Mediavine.
Furthermore, you can make money by selling your own products or services. For example, you could create and sell an online course or an e-book or offer your skills as a service to your readers.
If you don’t have a personal product/service to sell, you can promote other people’s products as an affiliate and get paid a commission for every sale using your affiliate link.

